Monday 31 October 2011

Applications of Reflection

At the beginning of class we had a review of the previous class and got time to work on our test review. We also were informed that we were going to get a practice test to work on today in preperation for our unit exam.


After that we took notes on the Applications of Reflection.


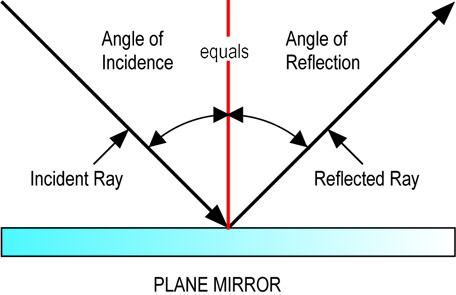
Diffuse reflection: When parallel rays of light strike a rough surface they creat different angles of incidence, so light rays reflect in various directions.


Then we learnt about the curved mirrors and will be focusing on mirrors that are cut from spheres.


1. Converging mirrors (concave)


2. Diverging (convex)


We started to take notes on the rules for locating images but the bell rang and we were told we would have more time to look at these notes tomorrow.


Mr. Banow looked like he thoroughly enjoyed dressing up this year and actually came close to looking like Albert Einstein....


I have no idea who is left to write the blog so I will pick someone tomorrow in class.


Sunday 30 October 2011

Locating and Finding the Number Images Through Mirrors at Any Angle

Last day we went over the laws of reflection.
The laws are:
- The angle of incidence is always equal to the angle of reflection.
- The incident ray, reflected ray and the normal all lie in the same plane.
We also looked at how to locate images from a point object and from a larger object.
Point Object(left) Large Object(right)


Today, we looked at how to find the number of images formed for one object when two mirrors are at any angle.

The equation for this type of problem is:


Examples:
a) 45 degrees- N= 360/45-1= 7 images
b) 180 degrees- N= 360/180-1= 1 image
c) 100 degrees- N= 360/100-1= 2.6 images
d) 0 degrees- N= 360/0-1= undefined

Then we learned how the eye sees the middle image when two mirrors are set at 90 degrees with an object places in the center of the mirrors. We found that the middle image does not actually exist. But, it is a reflection from either the first or second image.


The last thing we looked at was how the human eye can see images by looking through a periscope. We learned that the image from the top mirror is laterally reversed, but the bottom mirror reverses the image from the top mirror, resulting in an image that is normal.


The next person to write the blog will be Hilgy's :)

Wednesday 26 October 2011

Laws of Reflection

Tuesday, October 25
Today we took notes on the laws of reflection. The general rule for this concept is the angle of incidence must be equal to the angle of reflection.
The incident ray is the incoming ray while the reflected ray is the outgoing ray. The red line in this diagram is referred to as the normal and is usually drawn as a dotted line. The point at where the incident ray strikes the mirror is known as the point of incidence. You can also see that the angle of incidence = the angle of reflection which it should. Both the incident and reflected ray as well as the normal all lie in the same plane.
Wednesday, October 26
This diagram illustrates the characteristics of an image in a plane mirror. The image is the same size as the object, it is upright and laterally inverted. It is also virtual.
We also measured incident angles and used the normal to draw the reflected angle. The incident ray has arrows going toward the plane mirror while the reflected ray has arrows going away from the plane mirror. To end class off we had a plane mirror race. I beat everyone:)
The next blog will be written by whoever owns a special olympic cobalt:)

Monday 24 October 2011

Plane Mirror Activity


We began class with reviewing what we did last Thursday and Friday while Mr. Banow was away.
Thursday we learned and applied an equation showing the relationship between the image and the object. With the equation we could calculate magnification, find the height of the object and image, and find the distance of the object and the image.

hi/ho = di/do
h= height
d=distance
i=image
o=object

We then got a Pinhole Question worksheet and worked on that for the remainder of the period.

Friday we did the Pinhole Camera Investigation lab in small groups. The purpose of this lab was to investigate the properties of a pinhole camera and experiment with magnification of images. We used a pinhole camera and a lit candle to see the flame (image) in the pinhole camera. We discovered that in fact the image was inverted. As the distance between the pinhole camera and the object was greater, the image in the pinhole camera appeared smaller.

Today in class we began a new topic on plane mirrors. In small groups we did an activity to discover where the image location for an object was in front of a plane mirror. We placed a plane mirror in the middle of a piece of paper and then put a nail 5 cm in front of the centre of the mirror. We marked down that the nail represented the object. Then moving to the left with one eye open, we lined up another nail 5 cm away from the mirror in line with the original nail we saw in the mirror and marked it down as 1. We then repeated this step except instead we placed and marked down the nail 8 cm away from the mirror. After this we repeated the process on the right side labelling the two spots with a 2. Then we drew a line through the two labelled points and extended it beyond the mirror labelling them lines 1 and 2. Where the two lines intersected beyond the mirror was the image location. Then we drew lines from where Line 1 and 2 intersected with the mirror to the object. After that we drew perpendicular lines from where Line and 2 intersected with the mirror and measured the angles.


Although our group didn't achieve accurate results, the image on the opposite side of the mirror line was supposed reflected the same as the object. This activity was the beginning of our understanding on plane mirrors. The person in charge of the next blog will be Mackenzie :D

Wednesday 19 October 2011

Light... and Some Other Stuff

In physics today, we talked about light. We learned that light is the part of the electromagnetic spectrum that we can see. We learned a few definitions about light:

Luminous Body
: Something that emits light (ex. The Sun)
Non-luminous Body: Something that does not emit light (ex. Nina)
Incandescent Body: Something that emits light when heated (ex. A light bulb)

Transparent Material:
A material that transmits light/allows light to pass through it (ex. Polycarbonate/Plastic)
Translucent Material: A material that transmits light, but also scatters it (ex. Tissue Paper)
Opaque Material: A material that prevents light from passing through (ex. Metal)


Rays are used to represent light as light moves only in straight lines. Rays do not exist in nature!
A collection of rays is called a beam.

We also did some work on shadows:

Shadows form when an opaque object is placed in the path of light.
Umbras are areas of complete shadow.
Penumbras are areas of partial shadow.

An example that uses umbras and penumbras is a solar eclipse, where the total eclipse occurs in the umbra.

The last thing that we learned about this class was illuminance:

Illuminance
is the amount of light on a surface area. It is represented by the variable (E) and is measured in lux (lx).

Photometry is the science of measuring light.

The relationship between illuminance and distance is shown by this formula:
$E \alpha 1/d^2$
This means that, if you double the distance, the illuminance decreases by 1/4 and, if you triple the distance, the illuminance decreases by 1/9.

At the end of class, we had a few extra minutes, so we looked up and videos of eclipses and researched diodes and LED's.

I have done some work with diodes and I can explain what they are. Basically, they allow current to pass through one direction while blocking current from the other side. If you have more than one energy source, you need to use diodes or you could fry your circuit. They are more complex than that, but that is their basic function.

The person to write the next blog will be whoever has the longest hair.

Tuesday 18 October 2011

Transmission of light

We began class by finishing the hand-out we were given yesterday called Speed of Light Problems.Again using the formula v=d/t. While we were all working we also watched a Myth Busters video called Moon Myth BUSTED! Moon Laser!
This video was made to prove that humans actually made it to the moon and left retro-reflectors behind. Retro-reflectors are made to bounce light back at the light source regardless of the angle, this differs from the mirror where the angle of incidence has to be perpendicular. After they found the exact location of the retro-reflector they pointed a strong enough laser in its direction and detected the reflection proving that there was clearly people on the moon.
After the video we correct the handout and talked a little about transmission of light and waves interfering with other waves.
Then Mr.Banow made us draw this nice little diagram below before class ended..


The next blog post will be written by the tallest person in our class.

Monday 17 October 2011

Introduction to Light

Today we started the class off with listing what we know and what we want to know about light. The class mostly knew that light:
-Reflects
-Comes from the sun, light bulbs, and fire
-Travels fast
-And it doesn’t need a medium to travel.
And for Nina:

We also talked about convex, concave, and flat mirrors. The convex mirror made the soccer ball appear smaller than the original and right side up. The concave mirror made the ball appear larger than the original, slightly distorted, and also right side up. The flat mirror made the ball appear exactly the same as the original.


Measuring the Speed of Light
Galileo

Two people would stand far away from each other with covered lanterns. One uncovers their lantern, and then the other immediately uncovers theirs on seeing the light from the first.
Romer
Romer was a Danish astronomer who had made a systematic study of Io, one of the moons of Jupiter.

Michelson
Albert Michelson used an ingenious arrangement of mirrors. The light reflecting back from the concave mirror could only be seen by an observer if the octagonal mirror was rotating at certain speeds.

More recently, astronauts have attached a mirror to a rock on the moon; scientists on earth can aim a laser at this mirror and measure the travel time of the laser pulse.
The current accepted value of the speed of light is approximated as 3.00x10^8m/s (c) in a vacuum.
We ended the class with starting a handout called Speed of Light Problems.
Example: How long would it take for light to travel 3.00x10^4 meters?
d=3.00x10^4m

v=3.00x10^8m/s

t=?


v=d/t

t=d/v

t=3.00x10^4m / 3.00x10^8 m/s

t=0.0001s

t=1.00x10^-4s

The next person to write the blog will be the person with the smallest feet!

P.S. I'm sorry about the long space after my post. I couldn't get rid of it. And the equation ($) wasn't working for me either.


Wednesday 12 October 2011

Waves Unit Review

Last day in class we mainly just reviewed over things for the test on Friday. We started class off by getting back our intro to waves practice sheet from a previous class and watching Mr. Banow demonstrate with these metal bars how sound waves change their pitch by how long they are. We then got time to work on the review in class. Things we have been reviewing for the test have been labelling parts of the transverse wave, labelling a diagram of a standing wave and definitions of terms we have been using in this unit.

Next person to go will be the youngest person in the class.

Tuesday 11 October 2011

Figuring Out the Wavelength

At the beginning of class we quickly reviewed what a Standing Wave is; when two waves with the same properties interfere with one another a standing wave is produced.


Then we looked over some more notes showing the nodes and the anti nodes. Learning, the distance between successive nodes or anti nodes is half of a wave length.


Then amplitude at each anti node is the sum of the amplitude of each of the two original interfering waves.


[ Half of the total amplitude = amplitude of each original wave ]


Example :


1. If the amplitude of a standing wave in 40.0m what is the amplitude of each individual wave?


original wave = 20.0m (2 x original wave = standing wave)


2. The distance between the first and third node in 35.0cm, what is the wave length?
3. The distance between successive anti nodes in a vibrating string is 10.0cm. The frequency of the source is 30.0Hz. What is the wavelength of the wave? what is the velocity?
Then we worked on some questions out of the text book Physics 11, page 229 and 230 #1-3.

We also got a review for our test on Friday, which I am sure everyone has studied long and hard for! :)

The next person to write the blog is the person with the biggest hands.

Thursday 6 October 2011

Standing Waves

    A standing wave occurs when when two waves with equal properties interfere with one another. The interference produces a motion that resembles a 'loop' which moves from side to side. The antinodes are the tops (bumps) of the loops, which is the maximum constructive interference. Destructive interference occurs when the point in the standing wave does not move.


    Refer to page 228 of the Physics 11 textbook for further diagrams. 

    Through our standing wave generator experiment, we noticed that the string we used contained three antinodes and two nodes, when we held the string vertically with a wave generator attached to the end of the string. This occurred because the wave generator created upwards waves within the sting, which was reflected into downwards waves. This occurance created a standing wave and a superwave.

    We also learnt that the greater the frequency, the shorter the wavelength. The same idea applies as the slower the frequency, the longer the wavelength.

    Standing waves can also be demonstrated with different materials, such as a slinky and various string instruments.

   The next blog post will be done by the shortest person in the class.

Superposition of Waves


Last day in class we looked at these terms:
  • Wave Interference- when two or more waves act simultaneously on a medium
  • Principle Superposition- whenever two or more waves pass through each other, the resulting disturbance at a given point may be found by adding the individual displacements that each wave would have caused
In class today we looked at these new terms
  • Constructive Interference- when two waves combine to produce a wave with a larger amplitude (supercrest or supertrough)
  • Destructive Interference- when two waves combine to produce a wave with a smaller amplitude (Total Destructive Interference = zero amplitude)

Examples
  • A crest of 10cm meets a crest of 20 cm
10cm +20cm = 30cm
constructive interference
  • A trough of 13cm meets a trough of 10cm
-13cm + (-10cm) = -23cm
constructive interference
  • A trough of 23 cm meets a crest of 16 cm
-23cm + 16cm = -7cm
destructive interference
  • A trough of 15cm meets a crest of 15cm
-15cm + 15cm = 0
total destructive interference
An assignment from the textbook was later completed in class
Practise pg.221 #1-2 and Questions pg.222 #1, 2, 5
After the textbook assignment a practise sheet was also completed, another work-sheet that was for hand-in was worked on for the rest of the period.

Tuesday 4 October 2011

Investigation 10.5: Interference of Waves in a One-Dimensional Medium

In class today, we started off by going into groups and finding answers to Investigation 10.5. We were to answer the question: How do waves, moving in opposite directions, interfere in a one-dimensional medium? As a class, we came up with:


  • Two pulses pass through each other unaffected.

  • Two positive or two negative pulses create a pulse in the middle of the slinky that is much larger than the two original pulses.

http://www.youtube.com/watch?v=8IRZYOC7DeU


  • A positive and negative pulse creates a smaller pulse in the middle of the slinky as they pass each other.
http://www.youtube.com/watch?v=x_bUxiDadk8&feature=related


  • For two positive or two negative pulses:
The amplitude of the first wave + the amplitude of the second wave = the approximate height of the pulse created in the middle of the slinky


  • For a positive and negative pulse:

The amplitude of the positive wave - the amplitude of the negative wave = the approximate height of the pulse created in the middle of the slinky


To end the class we started taking down notes. The two new terms are:


  • Wave Interference - when two or more waves act simultaneously on a medium.

  • Principle of Superposition - whenever two or more waves pass through each other, the resulting disturbance at a given point may be found by adding the individual displacements that each wave would have caused.


How Waves Work

Last day we read in our textbooks and started our questions.

Today we worked and finished the questions we started on.

We learned that on a drip tank that areas that are lightly colored are showing the crests of a wave, and the areas that are darkly colored are showing the troughs of a wave. The light areas show that the rays are converging and the dark areas show that the rays are diverging causing the contrast in the waves.

We also learned that the frequency of a wave will not change when you increase the speed unless the source that is producing the wave changes.


We learned that when a wave hits off of a surface at an angle the wave that hits the surface is like the incident ray and the wave bouncing off is like the reflected ray. Mr.Banow said we would learn more about these terms when we learn about light.

We learned two new terms they were called diffraction and refraction.
-Diffraction->when a wave hits an opening or edge of an obstacle, the wave will change direction
-Refraction->when a wave changes a medium, the direction of travel does not change, and the wave is being entered at an angle.

We also learned what happens to a wave when it goes through a barrier with a small opening. It will curve around the edges forming a curved wave.


We also learned what happens when a wave hits a barrier with two openings. This will cause two separate waves to form and they will emerge with each other.


Then we went over our pendulum lab. We found out that amplitude does not change frequency or period. Changing the mass does not change frequency or period. Only changing the length will change frequency and period.

Rachel will write the next blog.

Monday 3 October 2011

Transmission and Reflections of water waves

In our last class we went over notes and extended them on a wave reflection and transmission. Mr. Banow showed us examples with materials of two different mediums and on the smart board. We then finished writing notes and began to read pages 214-217 and did questions 1-6. We only were given a few minutes to do these questions but we are going to have time to work on this on Monday at the beginning of class! Yay. Some of the awesome things we took notes on were waves often move from one medium to another medium(air to water etc.), if a wave passes from a more to less dense medium (slow to fast medium), the reflection wave will not invert and if a wave passes from a less to more dense medium (fast to slow medium), the reflection wave will invert. Suppose a wave is transmitted from a light spring to a heavy spring. The wave will travel faster in the light spring because its less dense. The wave length will be longer in the light spring than the heavy one.

Next to go will be a rock paper scissors tournament between the defending losers of our tournament. The loser is up next!